


Arrays are wonderful data structures that JavaScript developers can hardly do without. In a previous article, I gave three examples of the practical uses of arrays, if you haven’t read that article, you can do so here.
Unless you are working on a project that involves the use of arrays, the only other time you might encounter arrays is during coding challenges. Solid knowledge of how arrays work is very important if you want to be a good JavaScript developer.
In this article, I will share a simple project to visualize an array in the DOM. Naturally, when learning about arrays, you can either use console.log() or the alert() method to show the arrays directly in your browser, but in this project, you are going to represent an array with emojis.
But why emojis? You may ask. Well, first of all, emojis are very popular and there is a 99.99% chance that you use emojis in your daily communication online. Secondly, you can have an intuitive feel of how the array methods work in real-life projects. Thirdly, by the end of this article, you would have built a great visualization tool that can be used to teach arrays and array methods to beginners.
Before we begin, here are the three JavaScript concepts applied in this tutorial:
- DOM manipulation
- Functions
- Array methods
Now let us begin!
First of all, you have to learn how to display emojis in the browser. There are two methods of doing this; you can either go to google and search for any emoji of your choice and copy it as you would text, then paste it into your HTML code. The HTML code will treat the emoji as just any text and you are good to go. The second method is to use either the decimal or hexadecimal code of each emoji. Don't worry, you are not going to be creating any decimal or hexadecimal code, for they are already available online, just go to this URL and you will see a reference of both the decimal and hexadecimal code of all known emojis.
In this tutorial, I'll be using the decimal code. So, let us say I want to display the laughing face emoji in a paragraph, I will write the following HTML code:
<p>This is a smiling face 😀 </p>
Now, I think an explanation is in order: the decimal code is 128512, but the code will not work unless you add &# at the beginning and a semi-colon (;) at the end. So, if you go to the W3Schools emoji reference table and copy the code of any emoji, you have to add &# in front of the code and end it with a semi-colon, or else it won’t display in the browser. Note: not adding a semi-colon at the end will still display the emoji in most browsers, but to be safe, always add a semi-colon.
Now that we have established how to display emojis with code, it is time to move on.
Creating the HTML
Since the point of this project is to visualize arrays, the obvious thing to do is to create a div where the arrays would be displayed. Within the body tag, create a div and give it an id of “emoji-board”.
<div id = “emoji-board”></div>
Within the emoji-board div, write the following code:
<h1> Emoji Visualization 😀</h1>
<h3 id = “all”>Number of Items: </h3>
Explanation: The h1 tag is the main heading of the webpage and it displays a smiling face emoji. The h3 tag will display the number of items in the array immediately below it. It has an id of “all” to differentiate it from any other h3 tag that might be present in this code. Also, “all” is used because this h3 tag will display the number of items in the main array we will be creating. Next, create another div with an id of “allEmojis”.
Like this:
<div id = “allEmojis”></div>
This div is where the array of emojis would appear. Your code should look like this:
<div id = “emoji-board”>
<h1> Emoji Visualization 😀</h1>
<h3 id = “all”>Number of Items: </h3>
<div id = “allEmojis”></div>
</div>
When you have this code, it is time to move on.
Creating the CSS
We are not done with the HTML as we are still going to add some more code to our HTML file, but for now, let us give our page some styling. First, style the body tag like this:
body{
    display: flex;
    flex-direction: column;
    align-items: flex-start;
    justify-content: center;
    background-color: #433c9b;

}
Next, style the emoji-board div like this:
#emoji-board{
    display: flex;
    flex-direction: column;
    flex-wrap: wrap;
    align-items: center;
    justify-content: center;
    border-radius: 10px;
}
Now, style the allEmojis div like this:
#allEmojis{
    display: flex;
    flex-direction: row;
    flex-wrap: wrap;
    align-items: center;
    justify-content: center;
    background-color: #ffff;
    border-radius: 10px;
    font-size: 40px;
}
Don’t forget to link your CSS file to your HTML using:
<link rel="stylesheet" href="emoji.css">
Once you have this code, take a moment to study it to see why things are the way they are, It is obvious that I used CSS flexbox. If you refresh your page in the browser, nothing has changed except the background color, this is okay because our emoji display would be taken care of in the JavaScript code.
Creating the JavaScript
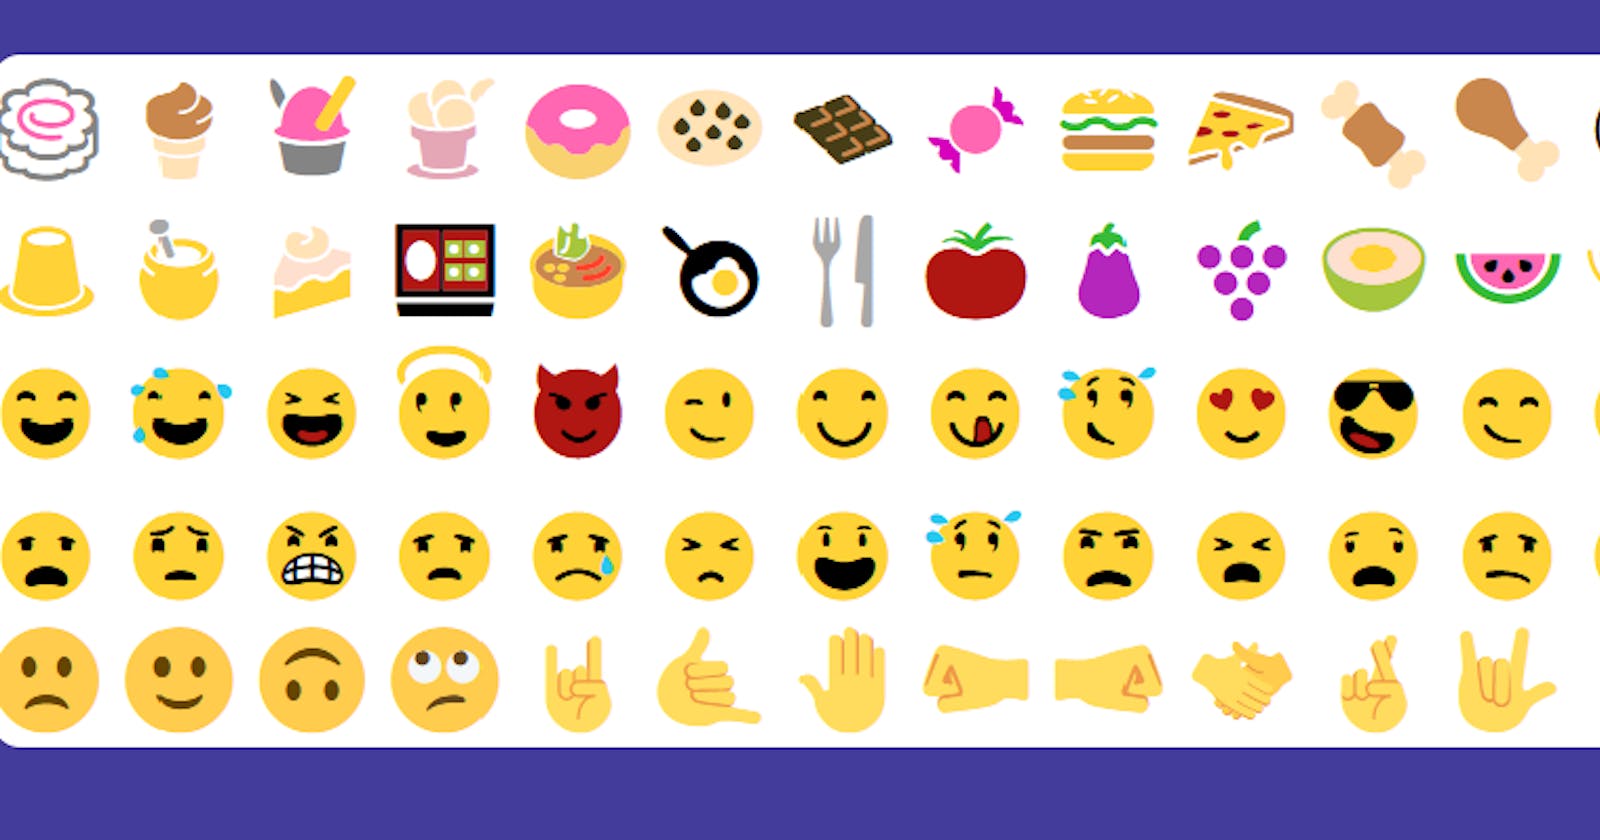
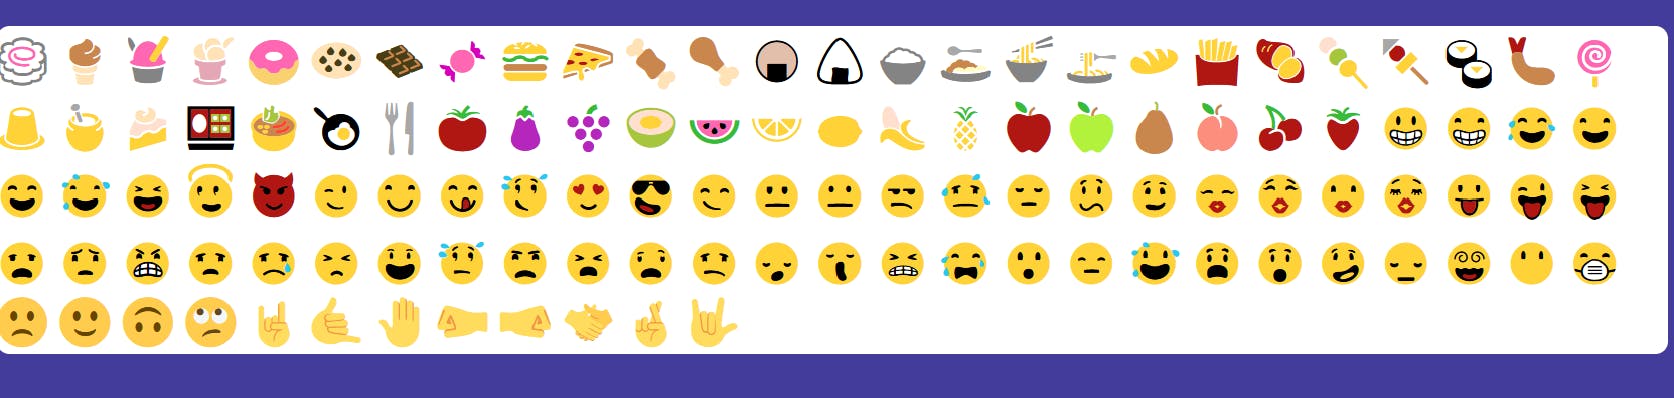
The first thing to do would be to create a massive array of emojis, you can use any emoji of your choice but your array has to be in the following format:
const emojiArray = [
"🍥", "🍦", "🍧", "🍨", "🍩", "🍪", "🍫", "🍬",
"🍔", "🍕", "🍖", "🍗", "🍘", "🍙", "🍚", "🍛",
"🍜", "🍝", "🍞", "🍟", "🍠", "🍡", "🍢", "🍣",
"🍤", "🍭", "🍮", "🍯", "🍰", "🍱", "🍲", "🍳",
"🍴", "🍅", "🍆", "🍇", "🍈", "🍉", "🍊", "🍋",
"🍌", "🍍", "🍎", "🍏", "🍐", "🍑", "🍒", "🍓",
"😀", "😁", "😂", "😃", "😄", "😅", "😆", "😇",
"😈", "😉", "😊", "😋", "😌", "😍", "😎", "😏",
"😐", "😑", "😒", "😓", "😔", "😕", "😖", "😗",
"😘", "😙", "😚", "😛", "😜", "😝", "😞", "😟",
"😠", "😡", "😢", "😣", "😤", "😥", "😦", "😧",
"😨", "😩", "😪", "😫", "😬", "😭", "😮", "😯",
"😰", "😱", "😲", "😳", "😴", "😵", "😶", "😷",
"🙁", "🙂", "🙃", "🙄", "🤘", "🤙", "🤚", "🤛",
"🤜", "🤝", "🤞", "🤟",

]
I have selected the following emojis carefully based on my preferences, if you use my code you will soon see the kinds of emojis I selected. To display this array on our webpage :
- get the id of the div we want our emojis to be displayed like this:
document.getElementById("allEmojis") - store the id in a variable like this:
let niceEmoji = document.getElementById("allEmojis")
Now lets us create a function that displays the array in the div we want. This function should take in two parameters:
- The array we want to be displayed.
- The div it should be displayed in.
I called my function emojiSort() but of course you can call it whatever you like. Here is the code for the function:
function emojiSort(array, place){
    for(i = 0; i< array.length; i++){
        place.innerHTML += array[i] + " "
    }

}
Explanation: the function takes in two parameters i.e. array and place. Array stands for the array to be displayed and place stands for the div the array should be displayed in. Next, we loop through the array using:
for(i = 0; i< array.length; i++){

}
Then we set the div’s content to each element of the array using:
place.innerHTML += array[i] + " "
Take note: the emojis should be spaced that is why an empty string is added at the end of the code above.
Once you have created the function, the next thing is to call it. You can do that like this:
emojiSort(emojiArray, niceEmoji)
emojiArray is the massive array we created earlier and niceEmoji is the variable where we stored the div of id "allEmojis".
Now when you refresh the webpage in the browser, you would have a beautiful array of emojis on a white background!
Visualizing Array Methods
Now that you have an array of emojis in the browser, we can apply some array methods to see what they do. In this tutorial I will be dealing with the following array methods:
 - array.length
 - array.at()
 - array.indexOf()
 - array.slice()
 - array.splice()
 - array.push()
 - array.fill()
 - array.unshift()
The array.length method: This is used to find the length of an array or the number of items in that array. In this case, I want the length of emojiArray to be displayed in the h3 tag created in the HTML code. Remember this code? <h3 id = “all”>Number of Items: </h3>
So, in our JavaScript code, we store the h3 tag in a variable like this:
const all = document.getElementById(“all”)
Now we set the text content to the length of the emoji array like this:
all.innerHTML += emojiArray.length
If you are wondering why I used += instead of just =, the reason is simple, If I used just = the entire text in the h3 tag would be changed to the length of the array, but using += would add the length of the array in front of the text there before. Now, if you refresh your browser, you should see the text:
Number of Items: 116 on top of the emoji array. Good. Let’s move on.
The array.at() method: This is used to find any array item at a particular index. In this case, I want to find the item at index 48, so I say emojiArray.at(48). Now, since the emojiArray is quite large I don’t know what is at index 48 until I find a way to visualize it, so I took advantage of the all.innerHTML code to display the array at index 48 like this:
all.innerHTML += emojiArray.length + “ ” + emojiArray.at(48)
When you refresh your browser, you should see the smiling face emoji as well as the length of the array displayed on the webpage.
The indexOf() method: This is the reverse of the at() method; it is used to find the index of an item in the array. But why would we need to find the index of any item in the array? Well, for several reasons depending on the project we are building, but in this case, I want to find the index of two items in the array so that I can use the array.slice() method. Take note: The indexOf() method always returns a number. Try it yourself, log out emojiArray.indexOf(“🤟”) and emojiArray.indexOf(“🤘”) to the console like this:
console.log(emojiArray.indexOf(“🤘”))
console.log(emojiArray.indexOf(“🤟”))
You should get the numbers 108 and 115. Take note of these numbers as we are going to use them soon.
The array.slice() method: As the name suggests, this method is used to slice an array. It works by creating a new array from the array that was sliced. But we have to specify where we want to start and end the slicing. Something like this:
array.slice(start, end)
Where start and end are indexes of items in the array. This method will create a new array starting from the first index we entered in the bracket and stops just before the last index.
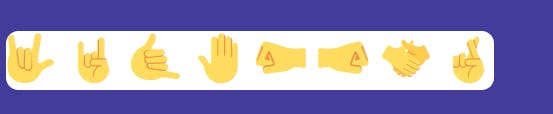
So if I want to create a new array by slicing emojiArray from index 108 to 115, I’ll do that like this:
let lastArrays = emojiArray.slice(108, 115)
Believe it or not, you have a new array consisting of the last few emojis in the emojiArray! You can confirm this yourself by logging out lastArrays to the console. What we want however is to visualize this array in the browser just like we did with emojiArray. To do this we can use the function created earlier i.e. emojiSort(array, place).
Now, it is time to go back to our HTML code and create a new div where we want lastArrays to be displayed, something like this:
<div id = “last-emojis”></div>
Now go to the CSS code and style it as you did for the emojiArray (You can just copy and paste code,) Finally, go to the JavaScript code and create a variable to store the div we just created, something like this:
let finalEmoji = document.getElementById(“last-emojis”)
Now you can use the emojiSort() function to display the lastArray array like this:
emojiSort(lastArrays, finalEmoji), refresh the page, and boom! We have a new array displayed in the browser.
You will observe that the item at index 115 i.e. the last array of emojiArray is not included in lastArrays, but don't worry, that is one of the quirks of the slice method. We can fix this by using either the push() or unshift() method.
Use lastArrays.push(emojiArray.at(-1)) or lastArrays.unshift(emojiArray.at(-1)) refresh the browser and note the result.
Push adds an item to the end of the array:

While unshift() adds the item to the front as you’ll see when you run the code.
The array.splice() method: Unlike the array.slice() method, splice does not create a new array rather, it has the feature of deleting a specified number of items and adding new ones. Here is the syntax and I’ll explain:
array.splice(index, deletecount , item1, item2)
Where: index is the index we are starting the splicing from, deletecount is the number of items we want to be deleted, while item1 and item2 are the items we want to replace the deleted items.
Let’s try it out:
lastArrays.splice(1, 2, emojiArray[22], emojiArray[33])
This code starts from the second item in the array, deletes 2 items, and replaces them with two other items from emojiArray. Run the code and see how it works in the browser.
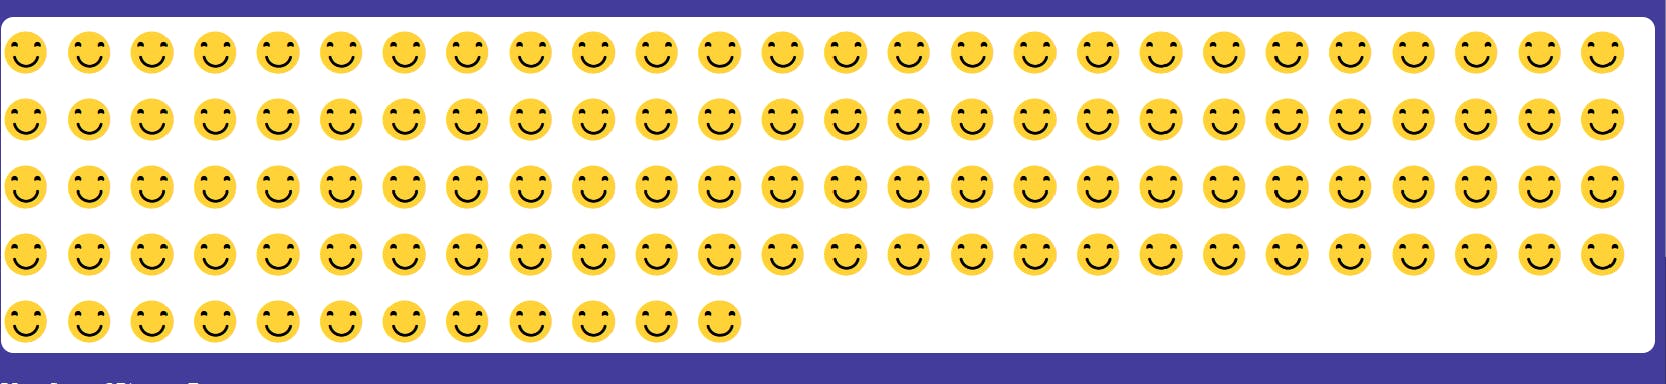
The array.fill() method: This method modifies an array by replacing every single item in the array with one particular item. Try this out with the emojiArray using this syntax:
emojiArray.fill(emojiArray.at(58)) and note the result, if you have been following this tutorial up till this point, you should have an array of smileys on your webpage.
Conclusion
Thank you for reading this article up till this point, I hope your knowledge of arrays and array methods has been improved a bit. You can use this little project to teach JavaScript to beginners and you can even extend it to build a valuable teaching tool.